A Git Gud Guide
Target audience
This guide is targeted towards people who have already used git and have some basic knowledge of how it works and which commands exists and what they do. The main purpose is to provide an overview into the good practices behind the OpenSource community.
Introduction
First things first. This guide assumes some general/basic knowledge regarding git. It was created by Linus Torvalds (creator of the Linux Kernel) and the source code is available here.
Documentation and other (more specific) guides can be found everywhere on the internet but mainly on Git SCM.
For starters Git is a “version control” tool. For the purpose of this guide I hope you know what this means. And more importantly I hope you understand why it’s sensible to use Git for software projects (and with the introduction of Git LargeFileStorage, design/media projects).
What Git basically allows you to do is create “snapshots” of your project (in a smart way, not by redundantly keeping the full files) by saving a “tree” of your “changes”.
Before going any further I’ll have to ask you to check your git version and make sure you have an up to date version. (type git version in your terminal). Another important aspect I recommend to everyone is using Git from your terminal for most work. There are many GUI clients and even IDEs come with Git capabilities but more than often these are cumbersome and lead to annoying and rage inducing moments. What I advise is the following:
- Have a terminal open at all times
- Use Git from the terminal for everything
- Except rebasing, for that I use VSCodes highlighting with manual rebasing
Pick a provider
- GitHub
- Owned now by Microsoft (this proved to be productive for Github’s evolution)
- Free unlimited private and public repos
- Plenty of integrations trough the “Apps Marketplace”
- Good interface for managing merges, projects, and pretty much everything
- Nice GUI
- Big community and social aspects
- By far the most popular of all three
- “Gists” hosting (kinda like PasteBin)
- GitHub pages and Wikis, allows you to create static websites for your projects using Jekyll and even hosting a personal website under
username.github.io.
- GitLab
- Use to be better than GitHub simply because of the free unlimited private repos, but now GitHub has that too
- Better projects organisation using folders and groups
- Amazing CI integration
- Can create “private” projects viewable only by other GitLab users (not sure why you’d do this)
- Can create Kubernetes clusters for your projects
- Pretty much better than GitHub in terms of GUI and what it offers, but it lacks the social aspects
- BitBucket
- I mean? It’s ok.
It’s not a life or death choice to pick a provider, you can actually use how many you wish. This can be achieved by setting up multiple remotes. For example:
# this can be your main remote
git remote add origin "github_project_uri"

# this can your other remotes
git remote add gitlab "gitlab_project_uri"
git remote add bitbucket "bitbucket_project_uri"

# now after commiting your files, you can do
# this to push to your GitHub remote
git push
# and then, the following for GitLab and BitBucket
git push gitlab master
git push bitbucket master
Git configuration
You can create a file ~/.gitconfig. I will provide my own configuration below:
[alias]
    co = checkout
    ci = commit
    st = status
    br = branch
    hist = log --pretty=format:\"%h %ad | %s%d [%an]\" --graph --date=short
    type = cat-file -t
    dump = cat-file -p
    undo = reset --soft HEAD^
[core]
    autocrlf = false
    safecrlf = true
[push]
    default = simple
[branch]
    autosetuprebase = always
[color]
    ui = auto
    branch = auto
    diff = auto
    status = auto
[color "branch"]
    current = yellow reverse
    local = yellow
    remote = green
[color "diff"]
    meta = yellow bold
    frag = magenta bold
    old = red bold
    new = green bold
[color "status"]
    added = yellow
    changed = green
    untracked = cyan
[user]
    email = [email protected]
    name = Jon DOe
    signingkey = XXXXXXXX
[filter "lfs"]
	clean = git-lfs clean -- %f
	smudge = git-lfs smudge -- %f
	process = git-lfs filter-process
	required = true
The signingkey is optional if you want your commits to be signed by your GPG/PGP key in order for other to know and trust the source of your commits. We’ll discuss this later.
Aliases
Also I have some shell aliases for git. You can come up with other names that are more natural for you.
# GIT
alias gpush='git push'
alias gpull='git pull'
alias gstat='git status'
alias gdiff='git-diff'
alias glog='git log'
alias gls='git-ls-files'
alias ggraph='git log --pretty=format:"%h %s" --graph'
alias gitc='git commit -S -m'
alias gitp='git commit --amend -C HEAD'
SSH Keys
You probably used Git with HTTPS remotes at some point, or maybe you still are. There are also SSH remotes. What this means is that you don’t have to insert your username or password every single time you want to do something privileged. With SSH you simply use your ssh-agent to provide authentication via public-private key. Discussing this in depth would go beyond the guides propose. Follow these instructions here or search for other.
Project setup
I usually start my project on the website of the provider before creating any files locally. For the sake of keeping this guide more focused on Git than GitHub/GitLab/Bitbucket/etc, I will use GitHub as an example.

Name & description
After this point you’ll be asked to name your project (pick something nice), I usually see a mix of preference between the naming style. I don’t believe there is a right one, but just keep in mind people will use the name to clone and find your project, so keep it short, simple, nice and relevant. Use the project description for a more detailed explanation.
Naming styles:
lowercase-with-hypenssnake_caseCamelCaseplease-dont_doThis
I like to associate my project naming convention with the language syntax convention, but most of the time I just end up using lowercase-with-hypens or simply lowercase single word.
Another thing you’ll be asked is if you want the repo to be private or public.
Note that all these things can be later changed, including the name of the repo. For example if you had github.com/username/som-project you can rename it in the repo’s settings to github.com/username/awesome-project or even something completely different. GitHub will keep the previous URL pointing to your newly name repo (this will change if you create another repo with the initial name).
LICENSE
- Do people care? Maybe.
- Do companies care? Maybe.
- Should you put a LICENSE on your project? Yes.
A LICENSE tells the people who want to use/modify/distribute/etc your project how to handle it and which steps are necessary. There many OpenSource LICENSEs out there, which range from permissive to restrictive.
If you aren’t sure which license to pick for a specific project, use the following website: Choose a License.
Some other “interesting” licenses worth mentioning:
README
I find it very important to keep a nice and clean README file. Whenever somebody visits your repository this will be the first thing they’ll see. First impressions matter. Sometimes I avoid potentially interesting projects due to the lack of a README and documentation.
If your project has no README then for somebody who is not familiar with your project, all they can see is a bunch of files and nothing else.
A good README should provide the following information (not necessarily in this order):
- The reason behind your project, and what it “brings to the table”
- An introduction and description
- Installation instructions
- Requierments
- Environment
- Download links
- Usage instructions
- Contribution guides
- Features list, TODO list
If you are unsure how to write your README check out some popular projects on GitHub.
README files come in all flavours (formats). The most common I believe is “MarkDown” (if you don’t know what Markdown is) but there are other version. I recommend avoiding TXT, and even sticking to Markdown as it’s supported everywhere (all my blog posts are written in Markdown :) ).
Badges
If you browsed OpenSource projects before you might have seen “badges” on people’s READMEs.
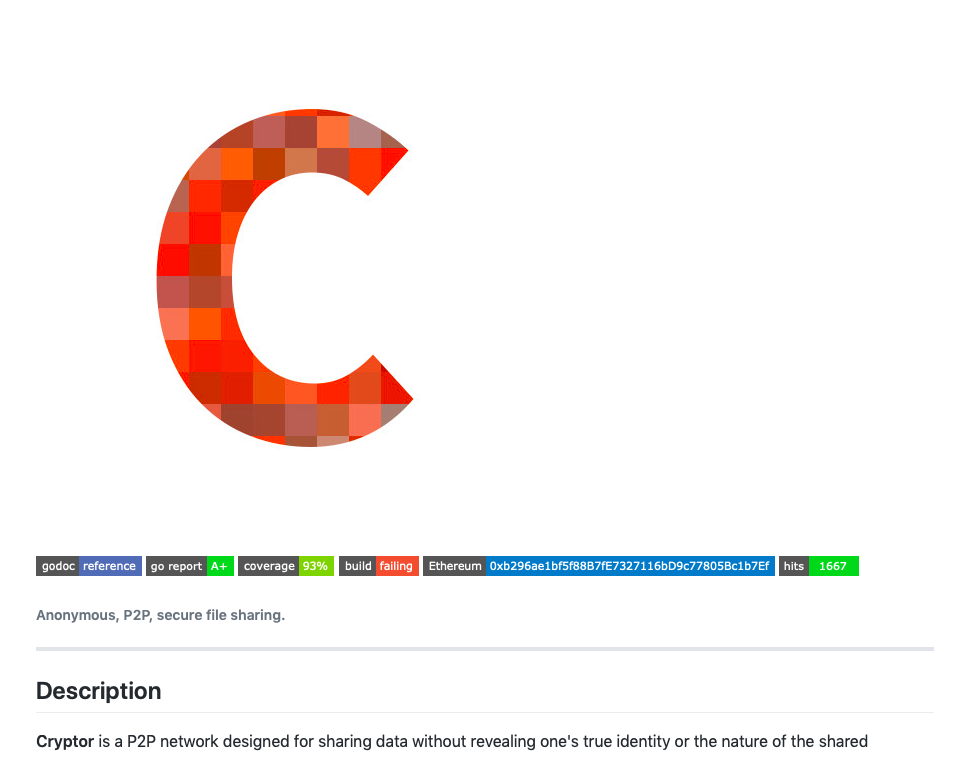
It’s usually nice to have badges to help improve the image of your project, badges can include different information such as: build status, code health, testing coverage, etc.
Try NOT to over encumber your README file with badges as it may end up looking tacky. The example above could do without the Ethereum address and hits counter.
Most services which provide badges will give you the “code” you need to insert into your README file based on it’s format. If you want to know more or generate your own badges, check this out: Shields.io.
Gitignore
When creating your repo on GitHub you’ll be asked to select a programming language for the .gitignore file. They have some very good templates that require little to no changes.
If you don’t know by now, the .gitignore file (or files, you can have multiple scattered around your project) tells git which files to ignore when git add .... For example you want to ignore common OS misc files (.DS_Store), you want to ignore caches (pycache), binary files (something.o, main.pyc), config files (_config.json) and other misc files/directories.
The gitignore pattern format can be used to ignore multiple files at once *.png will tell git to not commit any file ending in .png. A more in depth explanation of the patter can be found here.
Welcome
Now you should be welcomed by a screen like this (assuming you didn’t create any README, LICENSE or Gitignore file from within the web GUI, if you did you will have the project files view but can still obtain the remote URI, same steps apply below):
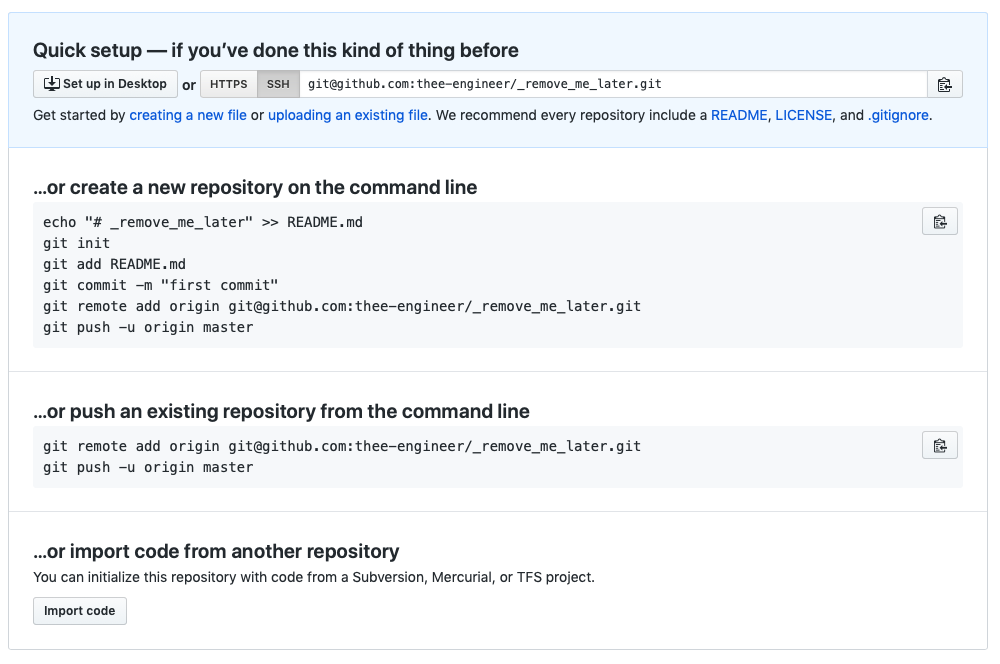
At this point you should copy the remote URI. If you decided to improve your life and use SSH then copy ([email protected]:thee-engineer/_remove_me_later.git) if you still want the painful HTTPS (https://github.com/thee-engineer/_remove_me_later.git).
With the remote URI in your clipboard, go to your terminal and type:
git clone [email protected]:thee-engineer/_remove_me_later.git
cd _remove_me_later
git status
And should see the following (or a single Initial commit containing the files generated above by the web interface).
On branch master

No commits yet

nothing to commit (create/copy files and use "git add" to track)
The things they don’t want you to know
GitAttributes
A not so popular “meta-git file” is the .gitattriubtes file. It allows some interesting configuration towards how files are treated and interpreted (Git Attributes, more in depth documentation).
For example you can tell the git diff algorithm how to treat different file types based on their extension.
*.docx diff=word
*.png diff=exif
You can tell git which files to commit using LFS.
*.pdf filter=lfs diff=lfs merge=lfs -text
You can tell websites like GitHub which languages to consider different extensions as.
*.h linguist-language=C

.github
GitHub allows the creation of a .github directory in which you can include 2 interesting and useful files.
ISSUE_TEMPLATE.md
When someone will open a new issue on your project, they will get whatever you wrote inside .github/ISSUE_TEMPLATE.md as their starting template.
Having a template like this helps with managing and sorting issues on a large project.
This is the template I use:
<!--- Provide a general summary of the issue in the Title above -->

## Expected Behavior
<!--- If you're describing a bug, tell us what should happen -->
<!--- If you're suggesting a change/improvement, tell us how it should work -->

## Current Behavior
<!--- If describing a bug, tell us what happens instead of the expected behavior -->
<!--- If suggesting a change/improvement, explain the difference from current behavior -->

## Possible Solution
<!--- Not obligatory, but suggest a fix/reason for the bug, -->
<!--- or ideas how to implement the addition or change -->

## Steps to Reproduce (for bugs)
<!--- Provide a link to a live example, or an unambiguous set of steps to -->
<!--- reproduce this bug. Include code to reproduce, if relevant -->
1.
2.
3.
4.

## Context
<!--- How has this issue affected you? What are you trying to accomplish? -->
<!--- Providing context helps us come up with a solution that is most useful in the real world -->

## Your Environment
<!--- Include as many relevant details about the environment you experienced the bug in -->
* Version used:
* Browser Name and version:
* Operating System and version (desktop or mobile):
* Link to your project:
PULL_REQUEST_TEMPLATE.md
Is the other file, which as the name says a template for Pull Requests. Below is the template I use:
<!--- Provide a general summary of your changes in the Title above -->

## Description
<!--- Describe your changes in detail -->

## Motivation and Context
<!--- Why is this change required? What problem does it solve? -->
<!--- If it fixes an open issue, please link to the issue here. -->

## How Has This Been Tested?
<!--- Please describe in detail how you tested your changes. -->
<!--- Include details of your testing environment, tests ran to see how -->
<!--- your change affects other areas of the code, etc. -->

## Screenshots (if appropriate):

## Types of changes
<!--- What types of changes does your code introduce? Put an `x` in all the boxes that apply: -->
- [ ] Bug fix (non-breaking change which fixes an issue)
- [ ] New feature (non-breaking change which adds functionality)
- [ ] Breaking change (fix or feature that would cause existing functionality to not work as expected)

## Checklist:
<!--- Go over all the following points, and put an `x` in all the boxes that apply. -->
<!--- If you're unsure about any of these, don't hesitate to ask. We're here to help! -->
- [ ] My code follows the code style of this project.
- [ ] My change requires a change to the documentation.
- [ ] I have updated the documentation accordingly.
Project structure
This will mainly depend on the language and software you’re using, but a general folder I recommend people to have is /docs/. GitHub will read /docs/README.md if you don’t have a /README.md. I usually put all documentation and related assets inside /docs/. Another nice aspect of the /docs/ directory is the GithubPages support. You can place your .md (or web files) inside /docs/ and then enable GithubPages on /docs/ directory. Allowing you to create a nice project docs website.
Management
Issues
When creating a repo on GitHub, it will auto-create some default Issues Labels (most of which are very good to have). You should have a look over them to get an idea of what might be missing or what might not be needed. I find colours are quite important (red for bugs, blue for enhancements, yellow for todo, (ノಠ益ಠ)ノ彡┻━┻ for when you had enough).
A very important and widely used issue label is help wanted (darkish green). It will allow people to search for projects (on your providers website or third party websites) which require help with different things. This is one of the best things in the OpenSource community, use it.
Milestones
Milestones allow you to sort/organise/group your issues into milestones. Telling your users and contributors what to expect and where the project is heading. A milestone can be a planned version of your software, or a very big feature which consists of multiple smaller blocks. Milestones can even have deadlines.
Projects
Do you like Kanban boards? Then this is for you. It helps you organise message, issues and pretty much anything into separate board. This includes some level of automation for simple Kanban layouts.
Releases
You can assign “releases” (behind the scenes tags will be used) to mark a certain checkpoint in your git history as a Release or Pre-Release. This tells people that the marked version should work as a binary. Releases are normally accompanied by binaries.
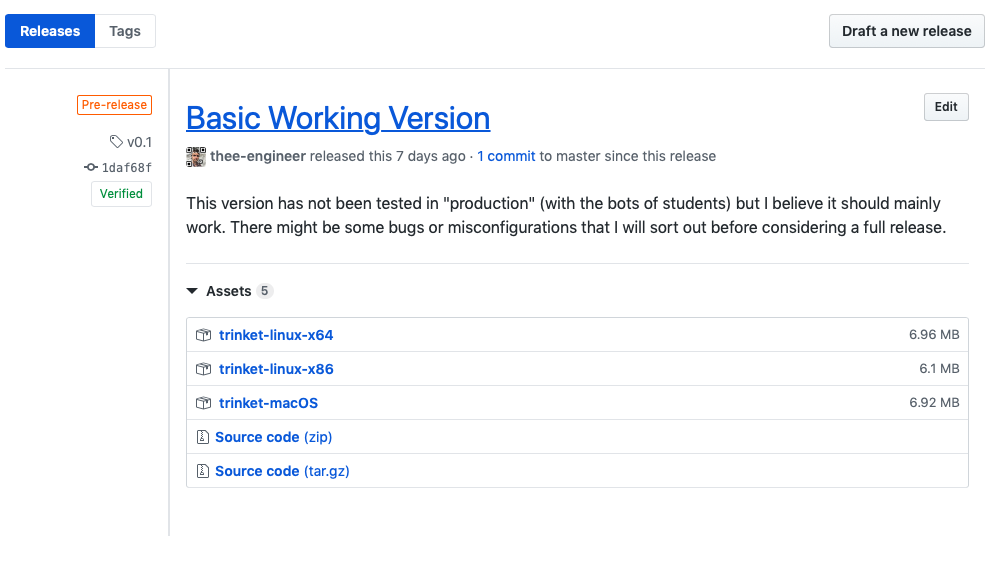
A good versioning scheme is v2.1 where 2 represents the major version and 1 the minor version. Some people prefer a v2.1.3 but frankly, tomayto, tomahto.
CI - Continuous Integration
CI allows you to setup an automatic pipeline where every time (or as often or not you wish it to be) you can have your code executed by a remote machine under certain environments. A good provider of such service is Travis CI - Test and Deploy with Confidence. They will have tutorials on setting up different configuration depending on the language and software you are using.
For example you might be working on a macOS machine on a Go project. You have certain environment settings which might influence the execution and compilation of your program. Distributing this without testing under foreign conditions might result in Linux/Windows users not being able to execute your program.
CI helps you avoid this by customising the pipeline to the point where your code gets tested after being published. The code can be tested under a clean environment, under different software version (eg testing Go 1.6 all the way to the latest version), testing your program to see if it compiles and runs under other operating systems.
Below is an example of my Travis-CI config file for Cryptor.
language: go

os:
  - linux
  - osx

matrix:
  allow_failures:
    - os: osx

go:
  - tip

before_install:
  - go get github.com/mattn/goveralls
  - go get github.com/wadey/gocovmerge
  - go get -v ./...

script:
  - make testall
  - cp build/report.out coverage.txt

after_success:
  - $GOPATH/bin/goveralls -coverprofile=build/report.out -service=travis-ci
  - bash <(curl -s https://codecov.io/bash)
  - make clean
Each section of this config file is better documented on the Travis-CI website. What you can take from here is the fact that my code has some prerequisites which are installed before executing the test-suite (on the latest Go version, under Linux and macOS) and after a successful test, the code goes to a coverage third party service.
Commit practices
This is subjective and it’s up to you. You decide when it’s the appropriate time and moment to create a new commit. This could mean:
- Committing every time you implement something new
- Committing each component individually
- Committing a days worth of work
- Committing every N amount of time
What I find nice is not pushing all the time after each and every commit especially if you are about to create a couple more commits.
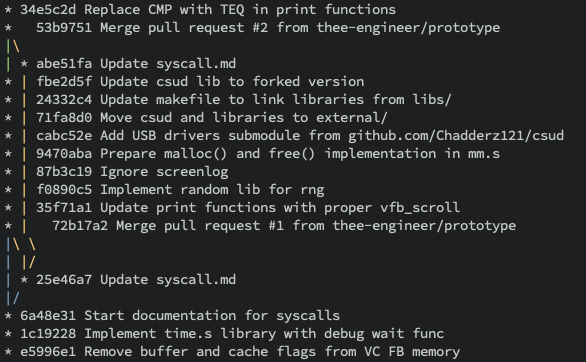
Try to keep your commit messages clean, relevant to the changes made. Start your messages with an uppercase letter and don’t be afraid to use multiple sentences but beware to limit your subject to 50 chars and wrap your body at 72 chars. What this means is you can use multiple commit “messages” for a single commit.
Try and keep your subjects in one sentence and DO NOT end it with a period.
git commit -m "This is the subject" -m "Followed by the body/description of this commit"
Use imperative!
Merge branch 'prototype`
Revert "Remove old package"
Merge pull request #42 from example/master
Add support for third party service
A more well structured and in-depth guide to commit etiquette: How to Write a Git Commit Message.